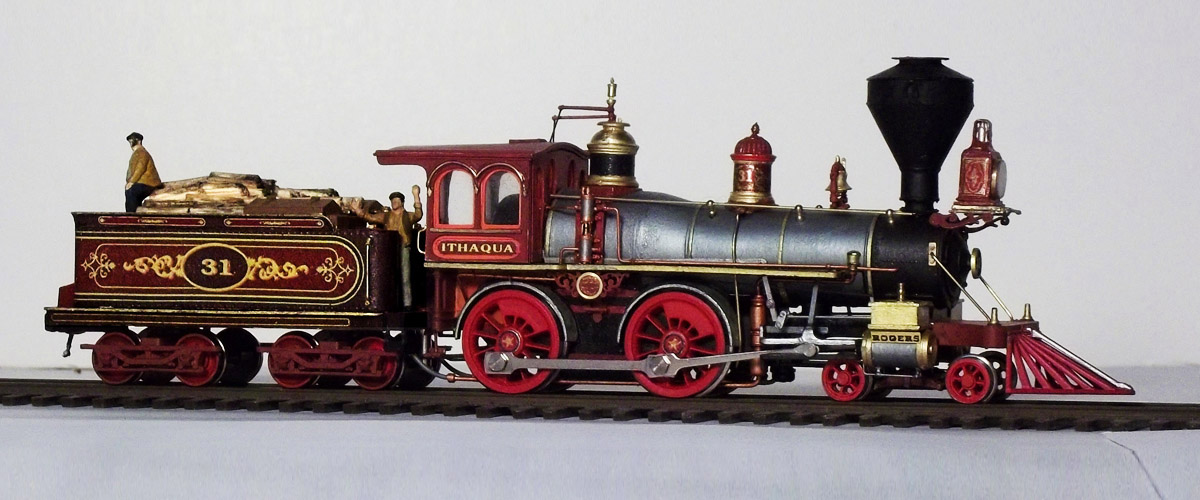
They Might be My Favorite HO Engines: Between the mid-1960s and the mid-1990s, the Italian company Rivarossi (and its affiliate Pocher) made a plastic-superstructured HO model 4-4-0 and exported them to the US through AHM and IHC. They run rough, are not quite to scale, and most of the early ones have oversized European flanges, unusable on anything approaching scale-sized track. Still, I got one as a Christmas gift a few years before Neil Armstrong walked on the Moon and I've been smitten with the little beasts ever since. Over the years I've managed to collect eight— oops, now its nine.
Of course, like most model locomotives, they came all black. For my Miskatonic Railroad, I wanted them in colorful 1870s livery. Every engine in that era was unique, and I wanted that reflected in my models. So I went to work on them...
The Prototype Problem: The prototypes for the Rivarossis were early-1870s Baldwin-built Virginia & Truckee engines— the Reno, Genoa, and Inyo. The models were made about 12% oversized for HO, closer to European OO (1/76 scale) than HO (1/87). In HO scale, the Rivarossi engines have 63" drivers on an 8-1/2' driver wheelbase— really big 4-4-0s, for the standards of the time.
However, by the late 1870s, both Baldwin and Rogers had engines of similar sizes in their catalogs. Looking at the Massachusetts map, my Miskatonic RR would have crossed some serious hills and dales in the Berkshire Mountains. I decided that having some big, powerful locomotives was justified.
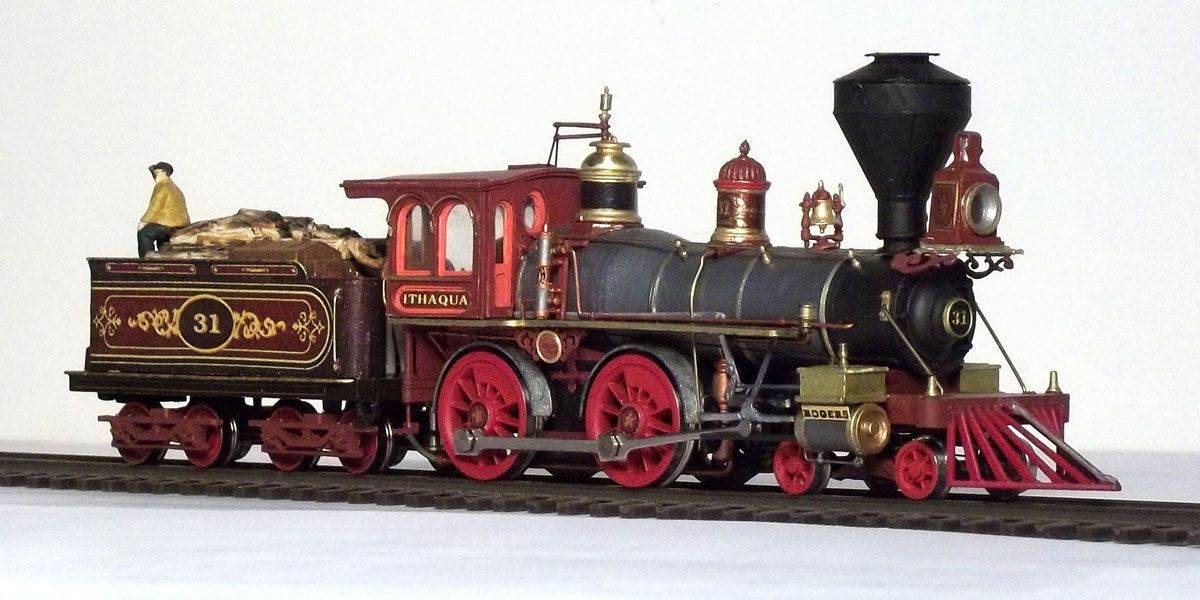
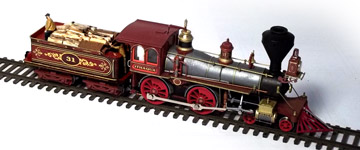
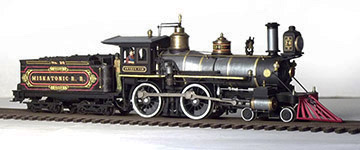
Some of those big engines from the 1876 Rogers catalog are at right... The Ithaqua, no. 31— above— was patterned after them. The paint scheme came from an 1875 engine in the William Halsey locomotive drawing collection at Southern Methodist University. See the bottom of the page for more about the Halsey collection.
The Ithaqua received a major makeover which included a new cab and new brass castings from Cal-scale and Precision Scale. Spoked pilot wheels and larger tender wheels also helped change the character of the engine. The Rogers builders' plate between the drivers is a brass etching by renowned Civil War RR modeler Al Mueller.
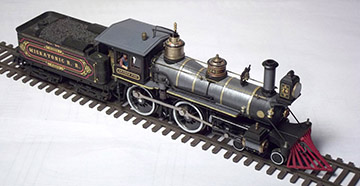
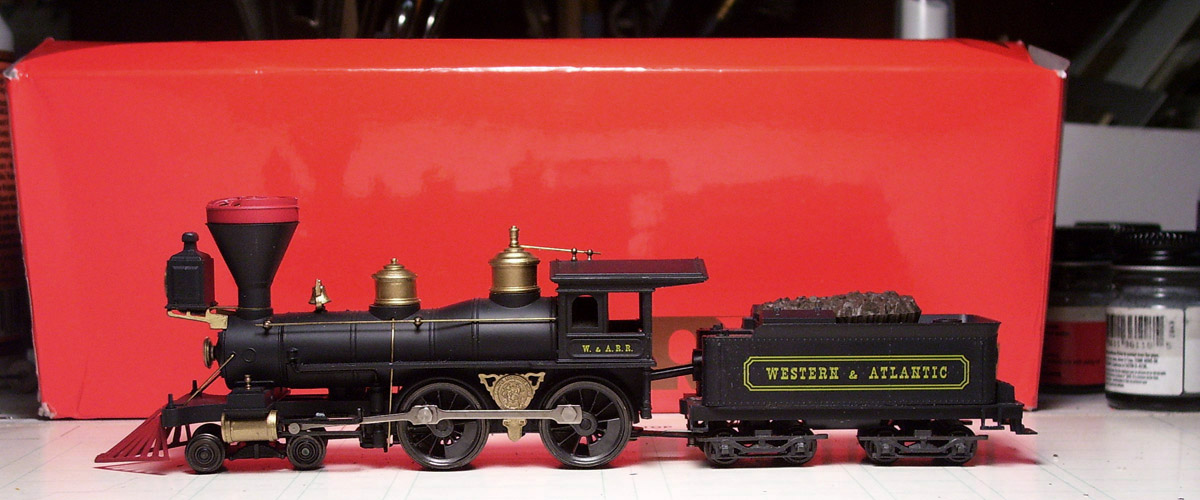
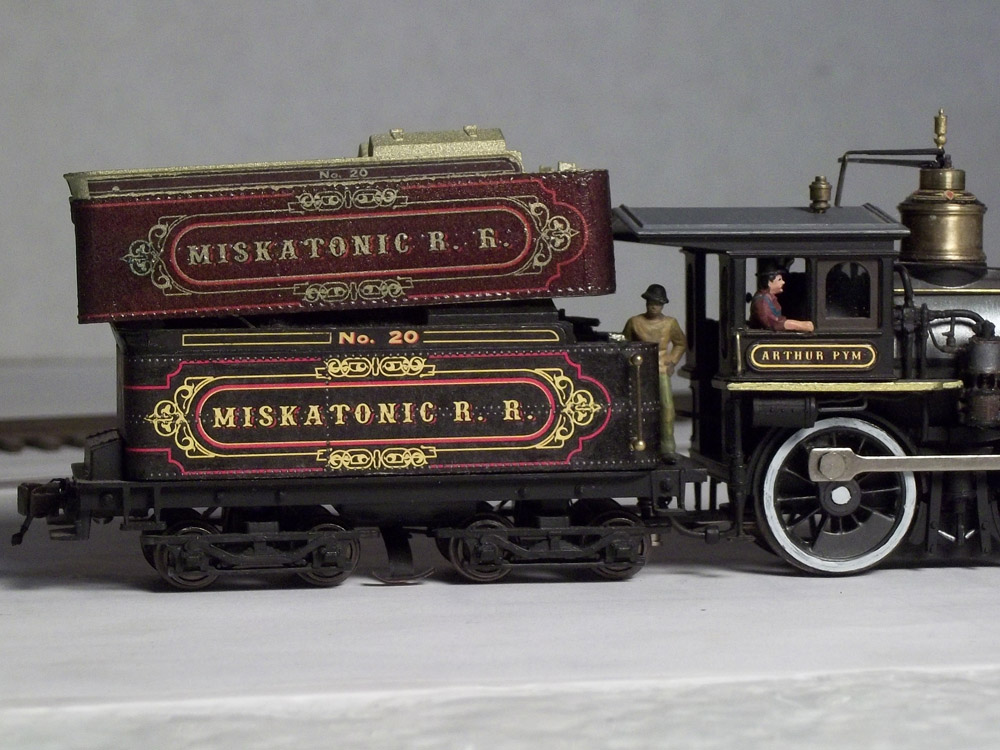
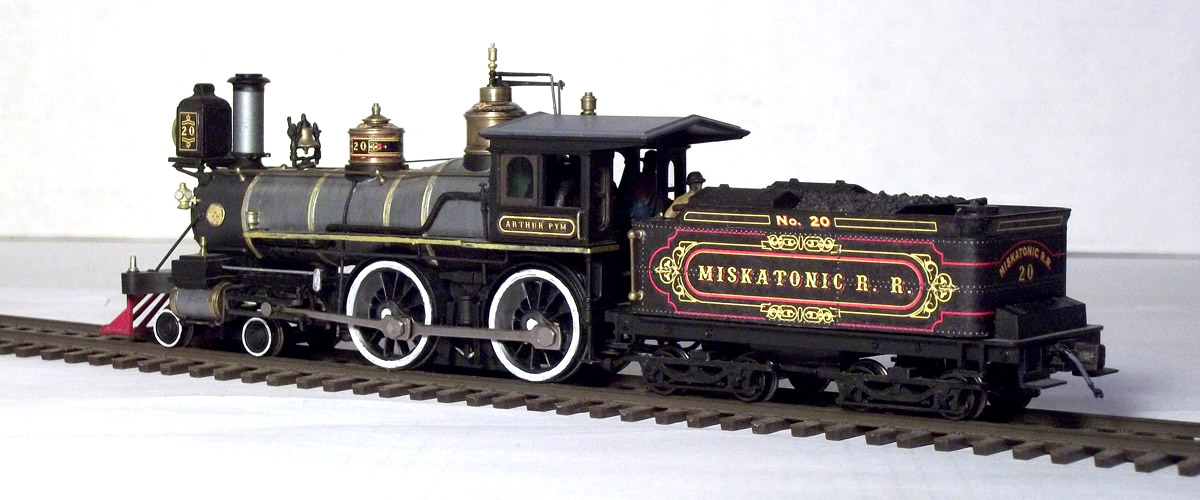
The Arthur Pym, no. 20, stayed a Baldwin engine and didn't need much modification other than a few castings and brass domes swiped from an early model Rivarossi, but it received a factory paint job typical for Baldwins of that era.
The prototype drawing from the 1880 Baldwin catalog is at right. I got the Baldwin Style 1 paint scheme from Dave Fletcher's wonderful Baldwin Styles Guide at www.pacificng.com.
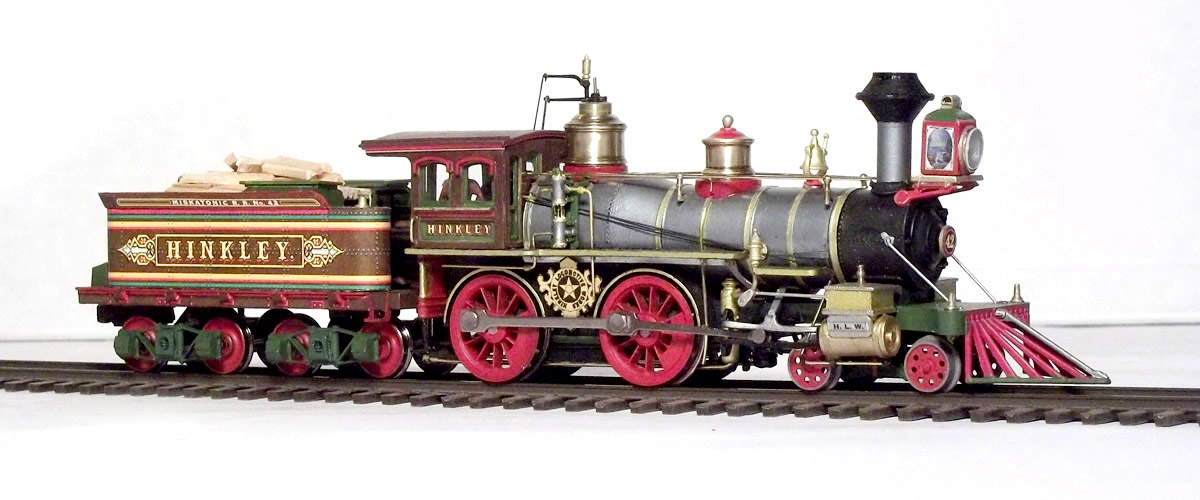
The Hinkley, no. 42, was inspired by the period lithograph at right, an early 1870s advertisement for Boston's Hinkley Locomotive Works. While working in Boston a few years back, my office was in a Civil War-era building less than a block from the site of the old works.
This engine got a new cab, domes, and lots of other castings.
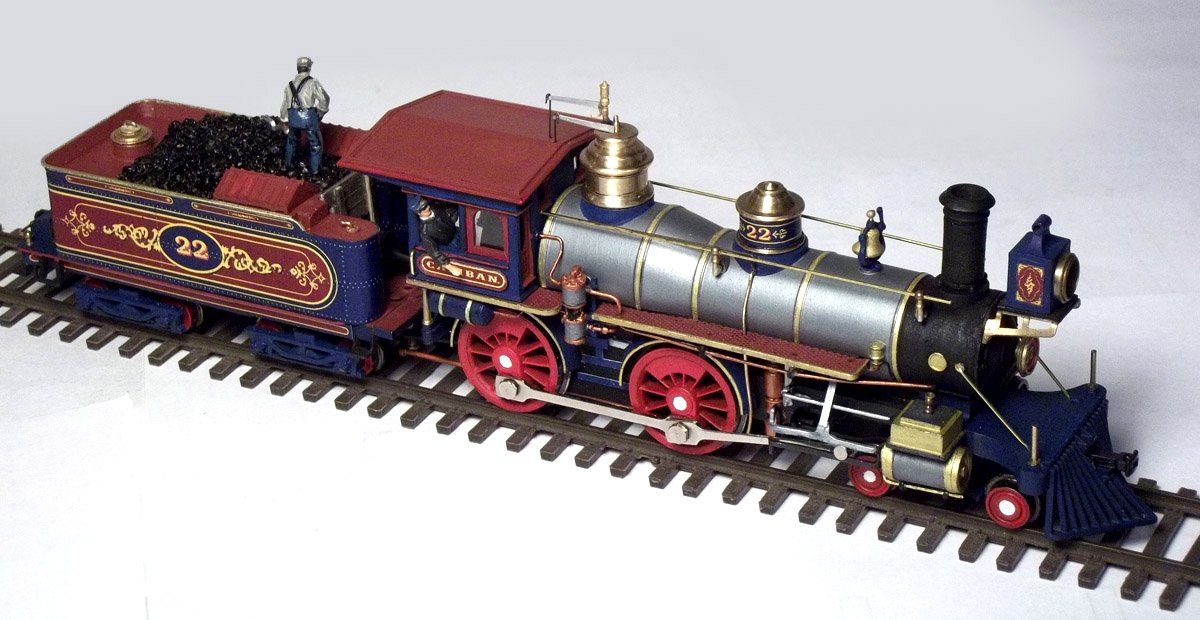
The Caliban, no. 22, has a paint scheme inspired by another 1875 locomotive in the William Halsey locomotive drawing collection (at right).
The Caliban got new domes from an old Mantua engine, along with a stack and headlight from MDC/Roundhouse kit leftovers. All four of these engines are late-model Rivarossis from the mid-1990s, with small flanges.
Click on pictures for larger versions
Some Variations on a Rivarossi Theme:
I like Rivarossi 4-4-0s... just not the way they come out of the box.
Here's a story about some engine makeovers.
DOWNLOADABLE STUFF FOR FELLOW MODELERS
Before the Victorians sobered up in the mid-to-late 1870s, locomotives were extravagant works of mechanical art with bright metals, polished woods, and colorful paint. No two were alike... but historical sources for old locomotive paint and decoration schemes have been notoriously scattered among out-of-print books and hard-to-find websites. I did a lot of looking, scanning, and image-downloading before embarking on this project. Here's some of the results.
1.
2.
3.
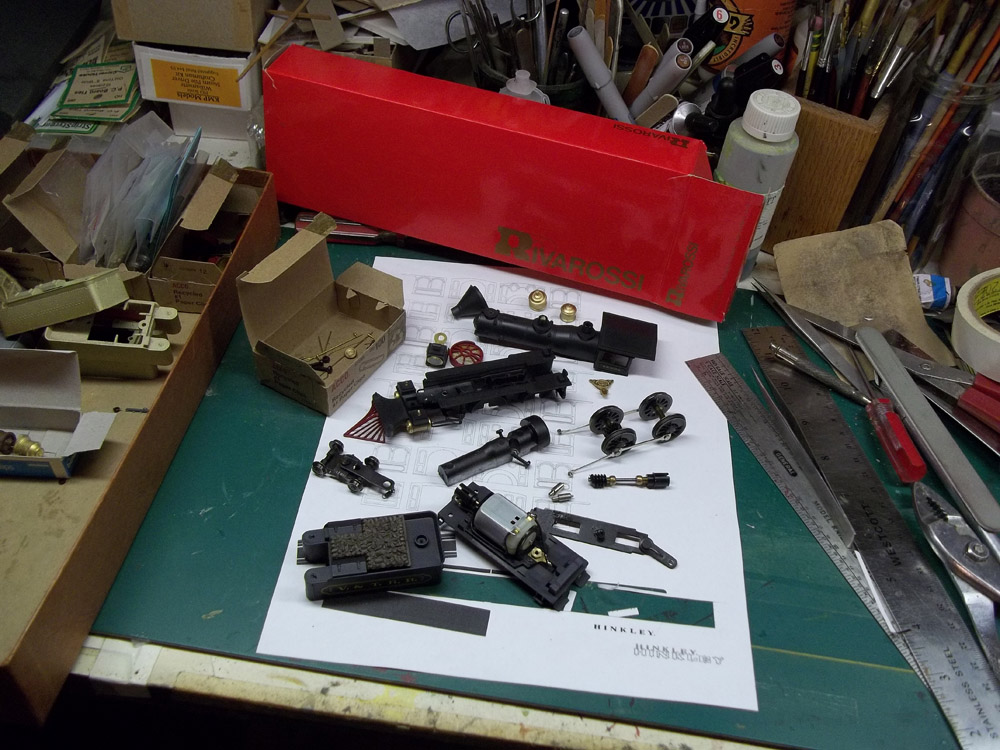
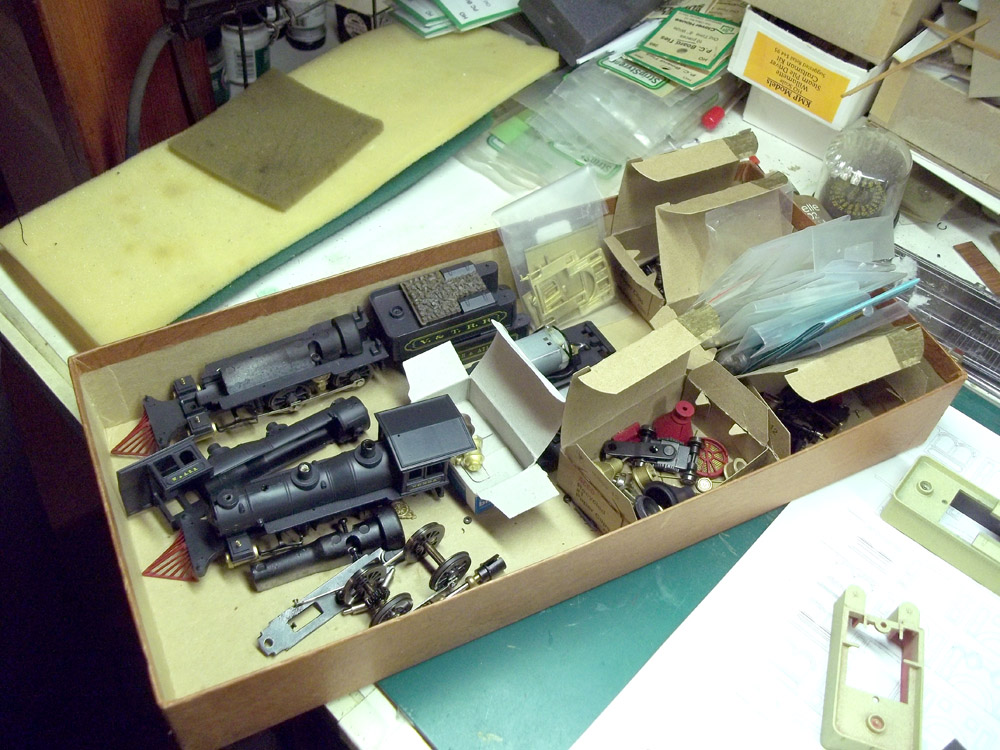
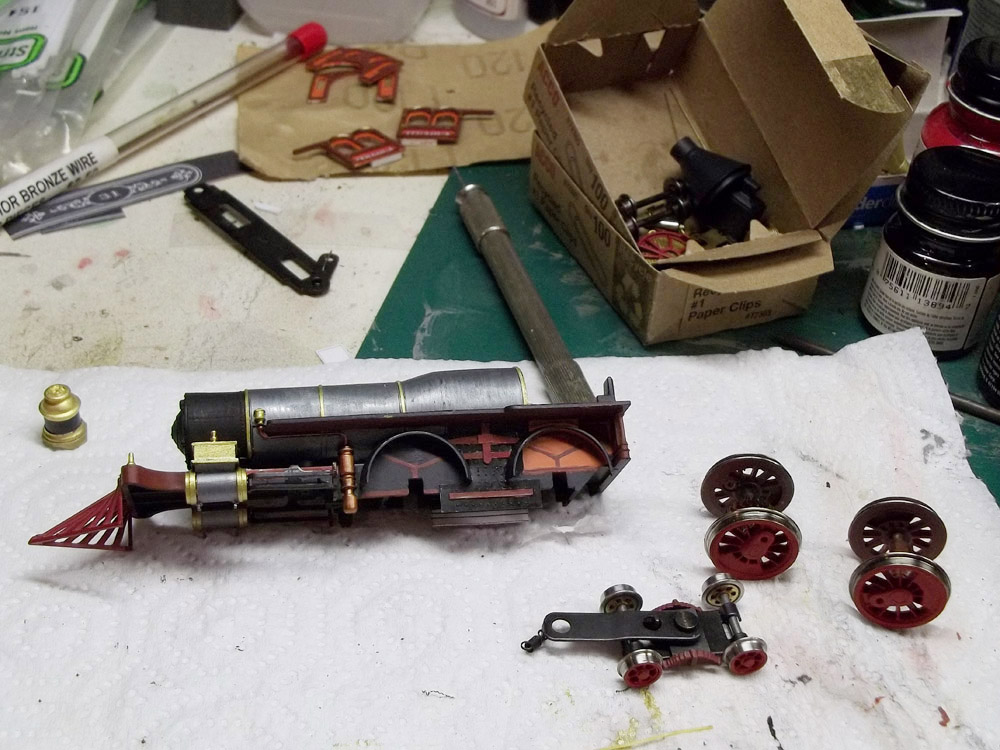
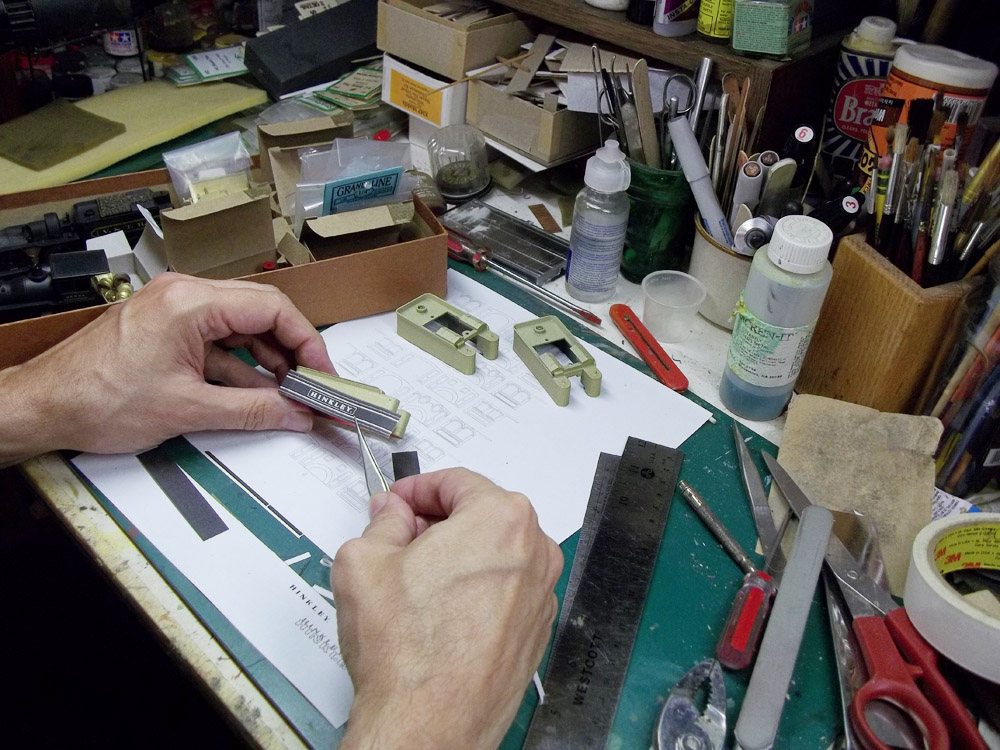
There's three basic steps to any engine makeover: disassembly—paint-the-heck-everything— then reassembly. Take apart everything you can. It makes it easier to paint, to upgrade the mechanism, and to swap out parts.
Since I have the memory of an... um... er... Anyway— I use small boxes to keep all the parts organized. Paper clip boxes work just fine. I toss in all the spare parts from the scrapbox and new castings I intend on using.
New cabs start as printed drawings spray-glued onto Evergreen sheet styrene. The parts are cut out, the paper is peeled off, the individual pieces are painted, and then glued together.
4.
5.
6.
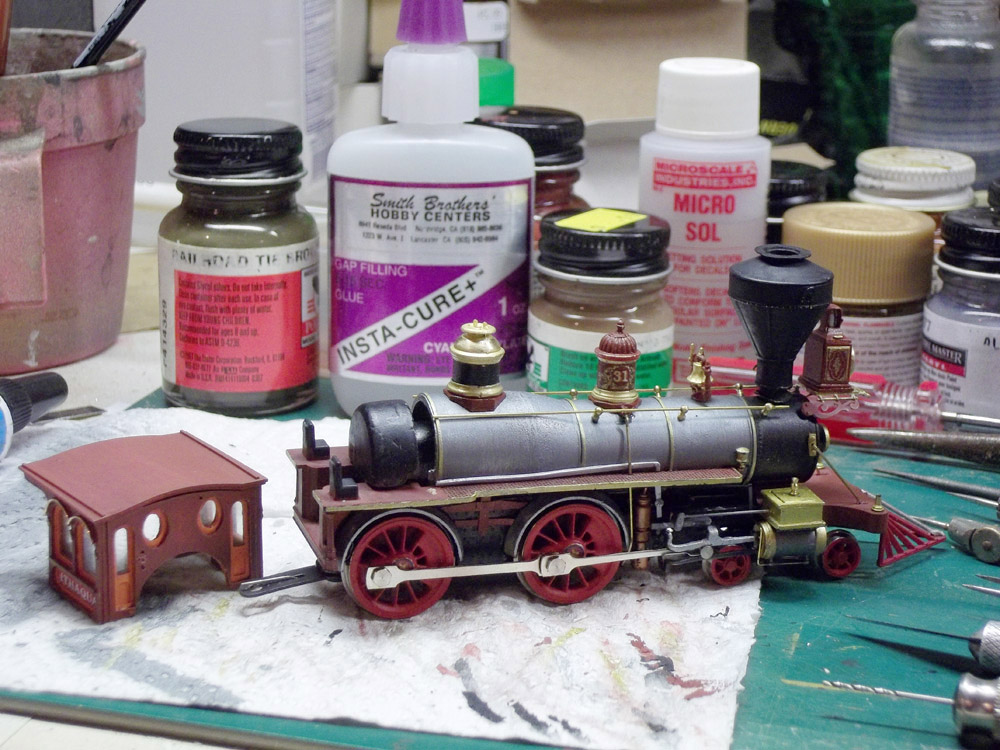
Since I was fitting new stacks and domes to some of the locos, I cut away the stack and dome bases on the plastic boiler shells and sanded them smooth. New rivet detail was added using Micromark's rivet decals.
I'm constantly checking parts for fit. Here, I'm using the partially disassembled chassis of another loco to test-fit the boiler, domes, stack, and cab. The cab walls are done, painted, and decaled. If I measured everything right, it'll fit in place of the old one.
I added firebox sides, plus hints of a frame and equalizers, between the drivers. It's all thin sheet styrene and Micromark rivet decal. The painted "Y" shapes represent leaf springs and can be seen between the driver spokes when the light is good.
7.
8.
9.
I used ModelMaster dark anodonic grey metalizer lacquer to represent Russia iron on the boiler. Buff it after it dries and it shines up nicely. Lots of brass, gold, copper, and steel paint gets used elsewhere. Parts are painted and decaled before getting glued on.
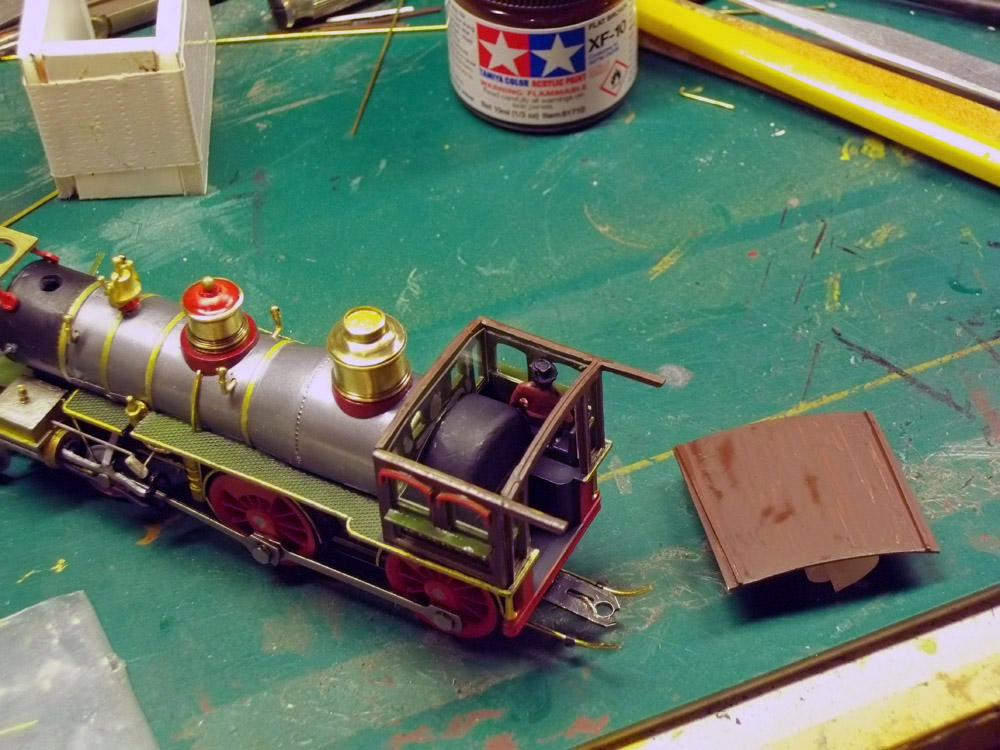
The reassembly is almost finished. Small scraps of styrene and wire become valve rods and levers, reversing bars, cylinder cocks, and all the running gear I have patience to add.
If you're going to put an engineer figure in your scratch-built cab, I suggest you do it before you glue on the roof...
10.
12.
11.
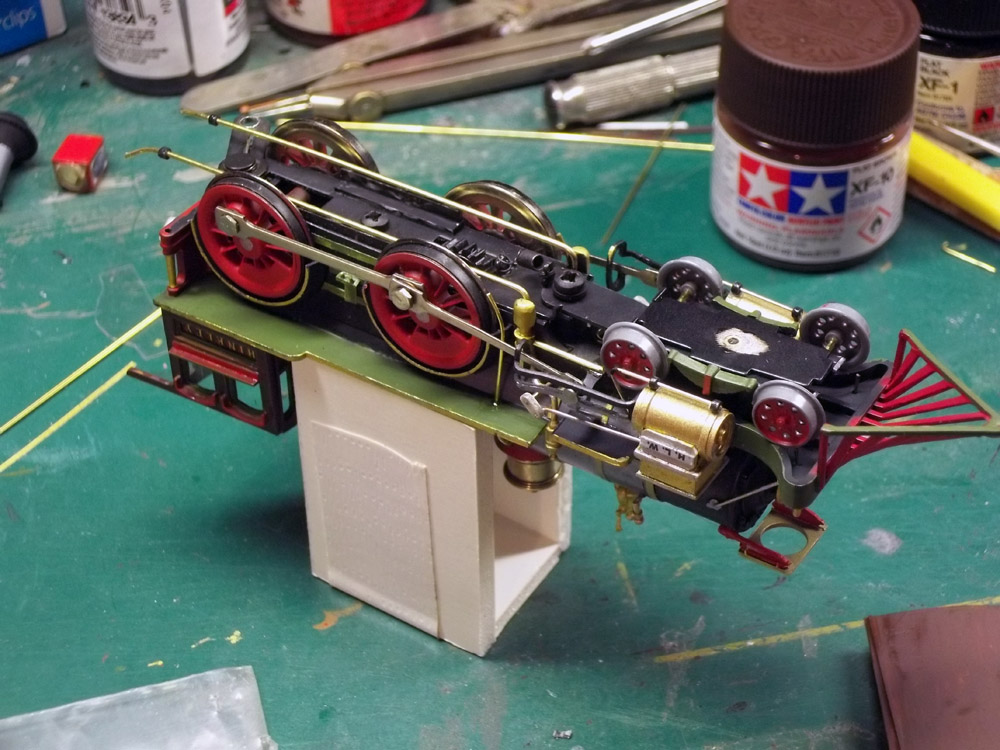
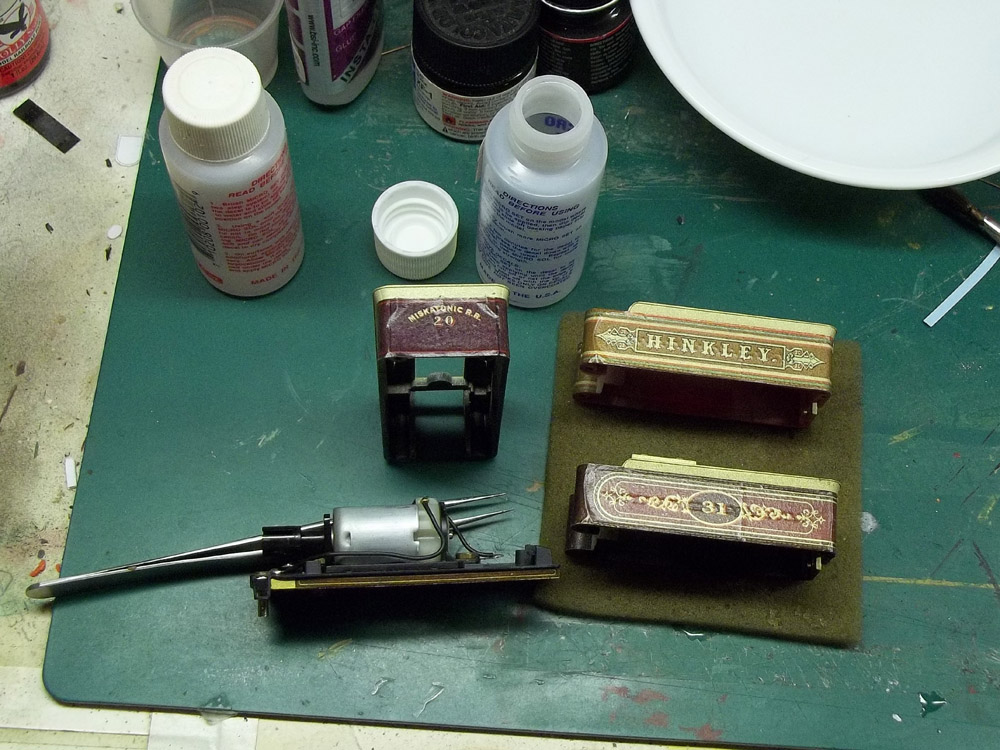
I shortened the tender drawbar, drilling a new hole for the tender pin about 1/8" inboard and cutting off the old end. This will make the tender ride closer to the engine. Another trick I used to hide the tender gap was to add a plastic extension to the tender's front footplate.
I made a handy little cradle out of 1/8" foam-core to rest the engines on while I work on their undersides. Here you can see the feed pipes for the crosshead pumps, glued to the bottoms of the firebox side extensions.
The tender decals are home-made, using art generated in Adobe Illustrator and laserprinted on blank Micromark decal sheets. Before I printed out the final versions, I printed the art on plain paper and cut it out to see how it would fit.
13.
14.
15.
I made several attempts to print the decals on transparent decal stock, letting the gold paint on the tender show through as gilt lettering. It was a technique that had worked well in the past using real brass tenders. This time, the decal over gold paint produced a result that was pretty "meh." See the top of the next frame.
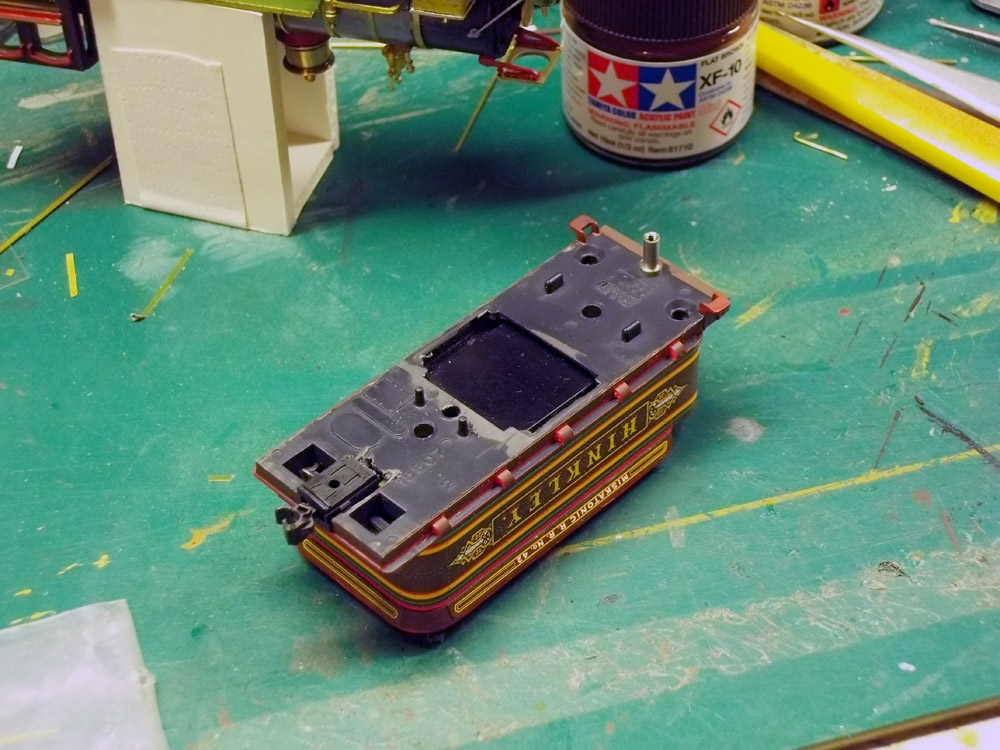
Yeah— "meh." The top tender shell has the decal over the gold paint. Other solutions were to print the decals on opaque white decal stock or just print a tender wrapper on good laser paper. I ended up using both methods. The Arthur Pym got a printed tender wrapper.
The last steps were to remove the weight on the bottom of the tender— it gets in the way if larger tender wheels are installed— and add a coupler. These engines really should have links-and-pins, but I used Accurail's scale-sized knuckle coupler since all my passenger cars are likewise equipped.
Notes on Rivarossi Makeovers:
So now the Miskatonic RR motive power department has a nice selection of 1870s 4-4-0s...
Hopefully this will inspire others to do some engine makeovers of their own. Thanks for looking.
COSMETIC FIXIT LIST for RIVAROSSIS
Nobody says you have to do them all...
CS=Cal-Scale, PS=Precision Scale
Frame and running gear:
New spoked pilot wheels (PS-31937)
Valve shafts and links (wire, styrene)
Crosshead brace (strip styrene)
Cylinder cocks (wire, styrene)
Reversing bar and links (strip styrene)
Firebox sides (sheet styrene)
Frames and equalizers between wheels (strip styrene)
Builders’ plates (for the Rogers–Al Mueller etching)
Crosshead pump feed pipes (wire)
Shortened tender drawbar
Boiler and superstructure:
New number plate (CS-190-245)
New headlamp (PS-31633, Cary-13-142 or Cary-13-143)
New headlamp bracket (PS-31306 or PS-31307)
New stack (CS-190-326 or old MDC/Roundhouse parts)
New pilot braces (wire)
Rivets for smokebox (Micromark 84985 rivet decals)
New bell (PS-31063 or Cary-13-144)
New sand and steam domes (for the Rogers— CS-190-342)
Sand dome lever (wire)
New whistle (CS-190-339)
Whistle and pop valve levers
New cab (Evergreen sheet syrene)
Cab steps (wire, styrene)
Brass boiler bands (strip styrene)
Injectors (for the Baldwin— Cary-13-203 or CS-190-341)
New check valves (CS-190-341)
Air pump and piping (PS-31023 or CS-190-256)
Valve cock and water pump actuators (wire)
Tender:
Tender brake wheel (CS-190-487)
New toolboxes (styrene)
Water hatch (old Rivarossi number plate)
Front footplate extension (strip styrene)
New coupler (Accurail 1020)
New wheels (Athearn 33” short axle)


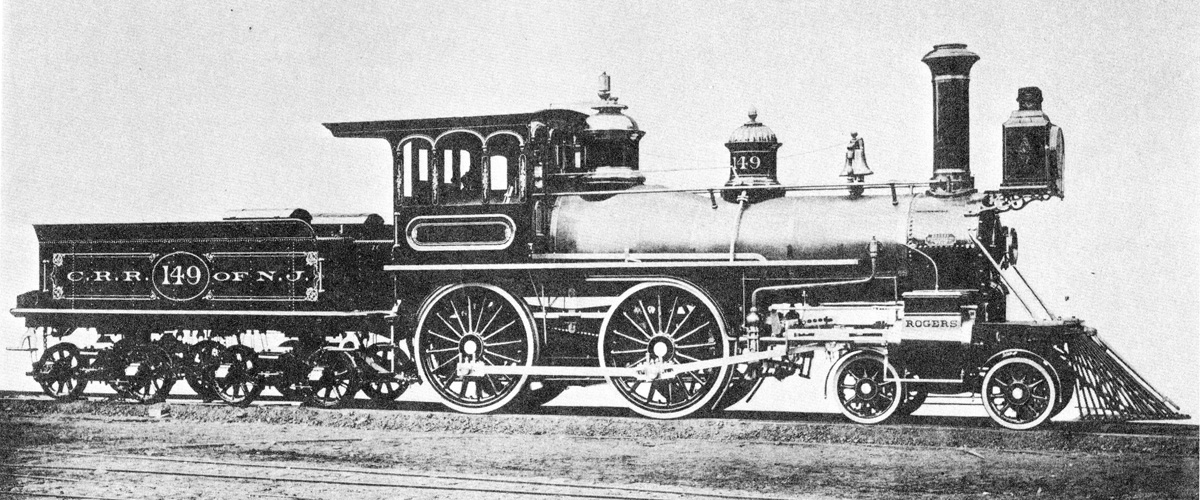
Rogers Locomotive Catalog, 1876
Class "P"
33 tons
54" to 66" drivers,
8' driver wheelbase
22' engine wheelbase
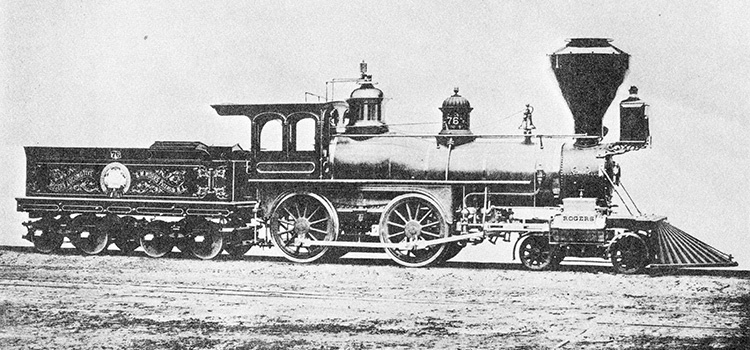
Rogers Locomotive Catalog, 1876
Class "F"
31-1/2 tons
54" to 66" drivers,
8' driver wheelbase
22' engine wheelbase
Baldwin Locomotive Catalog, 1881
Class 8-30-C
37 tons
61" to 66" drivers
8-1/2' driver wheelbase
22-1/2' engine wheelbase
This engine is almost an exact match for the Rivarossis.
See the bottom of the page for a downloadable collection of other colorful engine lithographs.
William Halsey made around 80 color drawings of Erie RR locomotives in the 1860s and 70s. See the bottom of the page for more information and a downloadable preview.